To see all the parts moving together see JK's animations of the Abloy Protec in action.

This is the 330 all nice and locked up.

Side view of the body. The left (bottom) hole is the access to the setscrew for the retaining ring. The lock must be open to access the setscrew and dissassemble the lock.

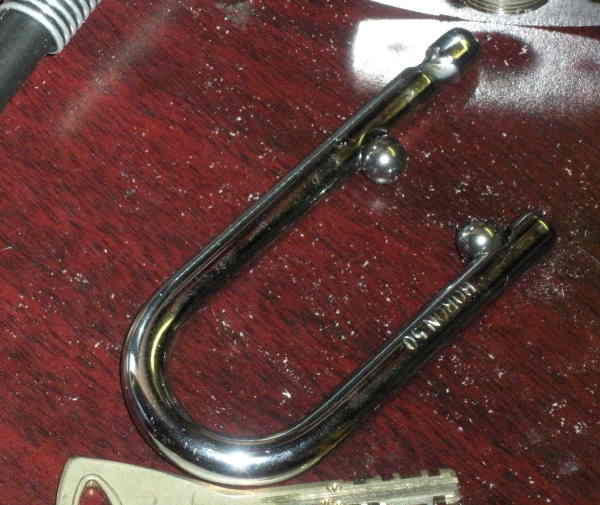
This is the 2 inch shackle for this lock with the ball bearings in the locking grooves. The shackle is made of borated steel and is eched with "BORON 50"

This is the retaining ring. You insert the cylinder in the lock and then screw this bad boy in and tighten the setscrew to keep the nefarious people in the world from stealing your cylinder.
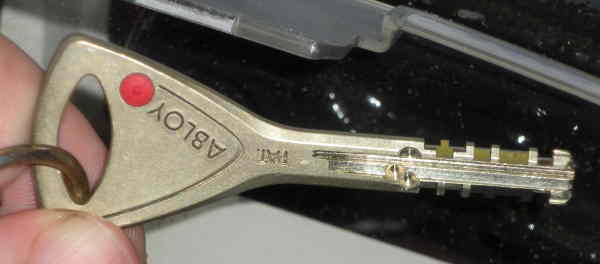
This is the key to the 330. Near the middle of the blade you can see three dimples and to the right you see a series of angled cuts. Abloy designed these locks so you can have all your Protecs keyed alike and use the same key event though the padlocks for instance only use one set of the dimples but some of the other locks use 2.

This is what the back of the cylinder looks like (the part that interacts with the ball bearings). Notice how the left is cut shallower than the right. This is so that the ball bearing on that side of the lock keeps a hold of the long end of the shackle. If not for this the shackle would fall off every time you unlocked it. (this keeps nefarious folks from stealing your shackle without also removing the cylinder). When the lock is locked the bearing have the round part forcing them out so they hold the shackle in place. This makes the lock shim-proof. When unlocked the cylinder rotates so the bearings call come back into the body of the lock a little bit to release the shackle.

These two anti-drill plates also perform another function. In this photo the key is only part way inserted and I tried to rotate it. This forced the plates outward and the little tabs at the top and bottom went into the cylinder body to prevent me from turning the lock.

It's kind of hard to see here but where the plate hits the key you can see a little bitty tab that does into one dimple of the key. This is where I was talking earlier about how the padlock version uses one set of dimples but some other locks use 2. The other locks use ball bearings in place of the anti-drill plates (or so I have been told). Notice how you can see the groove in the cylinder where the tab on the plate was forced into in the last picture.

Here is the drill plates removed. You can see the 2 holes on the silver colored thing. The drill plates have itty bitty protrusions that go in these holes. This is to prevent the discs from being rotated with out the proper key. The silver do-hicky runs through the middle of all the discs but only touches the 0 discs so the 0 discs always turn at the same time so the return bars don't get all crooked.

This is a view straight down into the lock with the do-hicky removed. You can see the two return bars at the bottom and the space on the first plate between the bars. All the discs have this but on the 0 discs the carved out area isn't as deep so that they will move the return bars with them. If the 0 discs are turned far enough the moving return bar will stack on the stationary bar and since all non-zero discs have little peaks in the carved area it will lock all the discs. Up at the top of the disc you can see the two real gates and the series of false gates. The position of the gates is dependent on the code of the cut on the key. 0 discs have the gates (and no false gates) 65 degrees off center line while the 6 cut only has one gate cute on center line as it doesn't turn at all. All the other cuts are in between but I should not that the gates on the other cuts are not made equidistant from center since the discs are made to turn either direction in locks not of the pad type. For a diagram showing what I am talking about see the Han Fey paper on http://TOOOL.NL. Remember the angular cuts in the key? If you look at the front disc here you will see a wavy oval type shape. The angles cause the bitting on the key to contact all the discs in the locks at different positions of the key rotation (0 cuts are constantly in contact with the disc and 6 cuts never touch the disc). This way when the key reaches 90 degrees all gates will be properly aligned to allow the locking bar to drop thereby allowing the entire cylinder to rotate.

This is what the cylinder locks like in the unlocked position. Notice the straight line running towards my finger? That is where the locking bar goes down into to allow the cylinder to rotate.

This is a side view with the locking bar inserted in the unlocked position. Notice the 10 little lines? Those are the spacers they hold the lock bar when the lock is locked. They also key the rotation of one disc from turning the adjacent discs. You can tell with this picture just how much thacker the discs are than the spacers.

Locking bar. It's basically a little bar of metal that locks the lock and drops in when the discs are properly rotated to unlock the lock. Locking bar. The name pretty much says it all.
Spacer. Again keeps rotation of one disc from effecting the position of the adjacent discs. The length of the gate keeps the spacer in the same position so it doesn't rotate and also holds the locking bar when the lock is locked otherwise the locking bar would just fall over or become misaligned because hey like the name says it is just a bar. The part that is between the locking bars is cut deeper than all the discs so the return bars do not affect the spacer and bend them since they are pretty thin.

This is an exploded view of my PL330. It has a lot of part as you can see. But as you also noticed there are no springs like a standard pins tumbler lock (in reality there is one spring but its only purpose is to push the cylinder against the face of the lock and it was lost in a recent earthquake. I guess I should have said no vital springs but oh well). The first time I disassembled this lock it took me about 2 hours to reassemble just as a warning if you do this your self. Also make sure you have needle-nose pliers or tweezers to save time. Also in the picture is the code card which is required to be shown to the locksmith before he can make you a new key (in case you didn't notice the "PAT" on the key the keys are patented for key control purposes) and you can't get these keys made just anywhere all willy-niily. You have to go to a Protec dealer (I think your original dealer but that may just be the level of control mine is keyed to) so the nefarious types can't borrow your key and go to the nearest Wal-mart and have permanent access to your valuables. The other thing is a Security Snobs business card. I am in no way affiliated with them (except as a regular paying customer) but I highly recommend them for your Protec needs. Remember that spring lost in the earthquake and now wandering the world alone? I contacted the company and told them what happened and they are sending me a new spring in the mail free. If you tried that with your laptop by calling HP they would laugh at you and make you send the computer to them so they could install the part no matter how simple it is. Sending minor parts to the customer if they request it is good business practice. I was even willing to pay for that spring but they said don't worry. These people know how to run a company. Enough about them if you would a more in depth look at the protec series of lock go read Han's articles. I just wanted to make it a little easier to show with real pictures vice drawing. Thanks for reading. tjweaver84